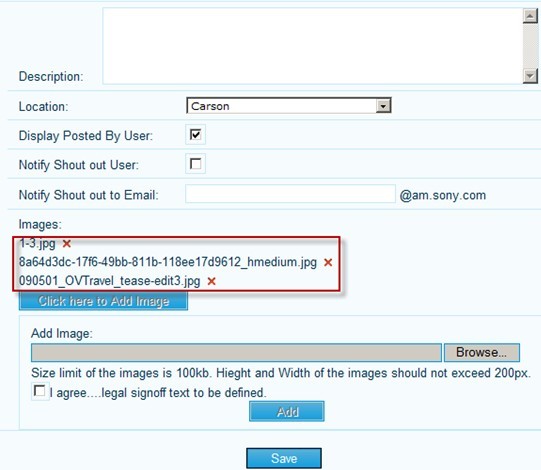
其中红色方框内的内容是通过脚本在页面上动态创建的,将用户在客户端所选文件的文件名动态添加到一个div里,同时在这个div中放一个隐藏的input type=’file’的标签,它的value为用户所选文件的路径,然后在div中放置一个img,添加onmouseover和onmouseout事件为图片增加了一些鼠标滑动时的效果,onclick事件用来响应用户点击img时删除对应的文件。看一下代码中的具体实现。
以下为引用的内容:
<%@ Page Language="C#" AutoEventWireup="true" CodeBehind="Default.aspx.cs" Inherits="WebApplication1._Default" %>
<!DOCTYPE html PUBLIC "-//W3C//DTD XHTML 1.0 Transitional//EN" "">
<html xmlns="">
<head runat="server">
<title></title>
<script src="MultiAffix.js" type="text/javascript"></script>
<script type="text/javascript">
var controlName = 1; // This variable is for the dynamic file controls's name.
function addImg(targetElement, savestatsElement, oldimgElement) {
var browseimgElement = $get("browseimg");
var arr = browseimgElement.getElementsByTagName('input');
if (arr.length == 0 || arr[0].value.length == 0) {
alert('No file inputs.');
return;
}
var oldbrowser = arr[0];
var filename = getfilename(oldbrowser.value);
if (!validateimgtype(oldbrowser.value)) return;
if (!validateimgcount(targetElement, 3)) return;
var imgtitles = savestatsElement.value + oldimgElement.value;
if (validateimgexist(filename, imgtitles)) { alert('You have already added this image!'); return; }
if (oldbrowser != undefined) {
var newbrowser = oldbrowser.cloneNode(true);
newbrowser.value = '';
var newfile = document.createElement('div');
newfile.innerHTML = filename + ' ';
// Create a button element for delete the image.
var newfileimgbutton = document.createElement('img');
newfileimgbutton.src = 'ShoutOut_Close.gif';
newfileimgbutton.alt = 'Delete';
newfileimgbutton.onclick = function() {
this.parentNode.parentNode.removeChild(this.parentNode);
savestatsElement.value = updatehiddenimgs(filename, savestatsElement.value);
}
newfileimgbutton.onmouseover = function() {
this.src = 'ShoutOut_Close_rollover.gif';
}
newfileimgbutton.onmouseout = function() {
this.src = 'ShoutOut_Close.gif';
}
browseimgElement.replaceChild(newbrowser, oldbrowser);
oldbrowser.name = ++controlName;
oldbrowser.style.display = 'none';
newfile.appendChild(oldbrowser);
newfile.appendChild(newfileimgbutton);
targetElement.appendChild(newfile);
$get("chkAgree").checked = false;
$get("btAdd").disabled = true;
savestatsElement.value += filename + '|';
}
}
</script>
</head>
<body>
<form id="form1" runat="server">
<asp:ScriptManager ID="ScriptManager1" runat="server">
</asp:ScriptManager>
<div>
<div>
Description:
<asp:TextBox ID="tbDescription" MaxLength="2000" runat="server" TextMode="MultiLine"></asp:TextBox>
</div>
<div>
Location:
<asp:DropDownList ID="ddlLocation" runat="server">
</asp:DropDownList>
</div>
<div>
Display Posted By User:
<asp:CheckBox ID="chkPostedByUser" Checked="true" runat="server" />
</div>
<div>
&
[1] [2] [3] 下一页